edu.irobot.com 싸이트 상단에 Learning Library 클릭 : 로봇 종류에 CREATE3 선택
https://edu.irobot.com/learning-library?robotValue=Advanced%20Create%203%20Robot&toggle=lessons
라즈베리파이 연결 방법
https://edu.irobot.com/learning-library/connect-create-3-to-raspberry-pi
라즈베리파이 연결 설명서
https://iroboteducation.github.io/create3_docs/setup/pi4/
우분투 서버 이미지를 다운받고 SD메모리 카드에 옮긴다
우분투 20.04 "서버" 버전을 설치하라고 씌여 있는데 "데스크톱"버전을 설치했다가 이틀을 날려 먹었다.
데스크톱은 윈도우OS 처럼 GUI와 각종 기본 프로그램 깔려 있어서 무겁고 느리다.
!! 역시 문장 하나하나 자세히 읽고 넘어가야 한다. 특히 영어라면 해석이 귀찮아도 잘 읽자 !!
!!!! 우분투 다운로드 링크로 가면 22.04 최신 버전이 올라와 있다
이걸 간과하고 그냥 다운로드하면 아래와 같이 개고생한다.
20.04 버전은 공식홈페이지에 안나온다. 아래 링크에서 꼭 20.04 서버 버전을 받아야 한다
https://pimylifeup.com/ubuntu-server-raspberry-pi/
라즈베리파이에 SD 메모리 CARD를 꼽기전에 아래 STEP4까지 작업을 먼저해야 한다.
STEP2에 보면 system-boot partition 이라는 곳에 usercfg.txt를 수정하라는데
이 파티션은 윈도우 OS에서는 보이지 않는다. (이걸 몰라서 하루 날려 먹음)
리눅스나 우분투가 설치된 노트북에 SDCARD를 연결해야, system-boot partition 보인다.
파일명은 usercfg.txt가 아니고 그냥 config.txt 를 수정하면 된다.
STEP3. cmdline.txt 에 rootwait 라는 명령어 뒤에 modules-load=dwc2,g_ether 를 추가한다
STEP4. system-boot partition에 있는 network-config 에 아래 내용을 추가한다.
usb0:
   dhcp4: false
   optional: true
   addresses: [192.168.186.3/24]
이 명령어는 라즈베리파이 USB-C 포트에 이더넷 주소를 할당하는 것.
CREATE3 로봇의 USB-C 포트는 생산할때 부터 192.168.186.2 로 설정되어 있음.
나처럼 network-config를 수정하기전에 SDCARD를 라즈베리파이에 꼽았다면 시스템에 적용이 안된다.
라즈베리파이에서 로그인 하고 아래 파일을 직접 수정해야 한다.
/etc/netplan/50-cloud-init.yaml
그리고 연결할 무선 wifi 정보를 입력해준다.
그래야 패키지 파일들을 인터넷으로 받아서 설치가 가능하다.
첫 부팅 전이라면 network-config를 수정하면 될것 같고, 한번 부팅을 했다면 netplan 폴더에 있는 yaml 파일을 수정
https://ubuntu.com/tutorials/how-to-install-ubuntu-on-your-raspberry-pi#4-boot-ubuntu-server
sudo nano /etc/netplan/50-cloud-init.yaml

wifis:
  wlan0:
    dhcp4: true
    optional: true
    access-points:
      "home network":
        password: "123456789"
라즈베리파이에 모니터, 키보드, 마우스를 연결하고 SDCARD를 꼽고 처음 부팅하면
로그인 아이디를 물어본다. 당황하지 말고 아이디 ubuntu, 비번 ubuntu를 넣는다.
!중요!
부팅하고 로그인 화면이 나와도 조금 기다렸다가 입력하자.
첫 부팅시 로그인 관련 무슨 파일을 만드는데 시간이 걸린다고 한다!
그러면 새로운 비번을 만들라는 안내가 나오므로 비번을 수정한다.
로그인이 되면 아래 명령을 토씨하나 틀리지 말고 입력한다.
sudo apt update
sudo apt install locales
sudo locale-gen en_US en_US.UTF-8
sudo update-locale LC_ALL=en_US.UTF-8 LANG=en_US.UTF-8
export LANG=en_US.UTF-8

sudo apt update && sudo apt install -y curl gnupg2 lsb-release build-essential git cmake

sudo curl -ksSL https://raw.githubusercontent.com/ros/rosdistro/master/ros.key  -o /usr/share/keyrings/ros-archive-keyring.gpg

echo "deb [arch=$(dpkg --print-architecture) signed-by=/usr/share/keyrings/ros-archive-keyring.gpg] http://packages.ros.org/ros2/ubuntu $(lsb_release -cs) main" | sudo tee /etc/apt/sources.list.d/ros2.list > /dev/null

sudo apt update && sudo apt install -y ros-galactic-ros-base python3-colcon-common-extensions python3-rosdep ros-galactic-rmw-fastrtps-cpp ros-galactic-rmw-cyclonedds-cpp ros-galactic-irobot-create-msgs

echo "source /usr/share/colcon_cd/function/colcon_cd.sh" >> ~/.bashrc
echo "export _colcon_cd_root=/opt/ros/galactic/" >> ~/.bashrc
echo "source /usr/share/colcon_argcomplete/hook/colcon-argcomplete.bash" >> ~/.bashrc
echo "source /opt/ros/galactic/setup.bash" >> ~/.bashrc

echo "export RMW_IMPLEMENTATION=rmw_cyclonedds_cpp" >> ~/.bashrc
   또는
echo "export RMW_IMPLEMENTATION=rmw_fastrtps_cpp" >> ~/.bashrc


reboot
혹시 key 관련 에러가 난다면
/usr/share/keyrings/ros-archive-keyring.gpg 파일이 있는지 확인하고
"E: Unable to locate package ros-galactic-ros-base" 와 같은 에러가 난다면??
구글 검색하다보니 ROS2 설치 싸이트를 찾게 되었다.
https://docs.ros.org/en/galactic/Installation/Ubuntu-Install-Debians.html
ros관련 패키지 설치가 안되면 위 명령중 제대로 안된게 있다는 뜻이므로,
/etc/apt/sources.list.d/ros2.list 파일도 있는지 확인할 것 (해당 파일 열어서 내용도 확인)
이건 ros 설치이후 입력하는 명령이라..
~/.bashrc 들어가서 입력한 내용에 틀린 부분이 없는지 볼 것
맨 마지막에 rmw_cyclonedds_cpp 또는 rmw_fastrtps_cpp중 하나를 선택해서 입력한다
! 초보자를 위한 개발 가이드!
새벽까지 했는데도 잘 해결이 안된다면 발닦고 자라.
더 붙들고 있어야 해결도 안되고 몸만 망가진다 - 단, 급하면 하루 이틀만 밤새자!
자고 일어나면 새로운 방법이 떠오른다.
구글 검색과 시간이 약이다.
root 비밀번호 설정 방법
https://linuxconfig.org/how-to-set-a-root-password-on-ubuntu-22-04-jammy-jellyfish-linux
$ sudo passwd
[sudo] password for linuxconfig:
New password:
Retype new password:
passwd: password updated successfully
STEP5. 로봇 뚜껑을 열고 USB/BLE (블루투스) 선택 스위치를 USB로 하고
USB-C to USB-C 케이블로 CREATE3와 라즈베리파이를 연결한다.
https://iroboteducation.github.io/create3_docs/hw/adapter/
별걸 다 했지만 원인은 22.04 Jammy 버전을 설치했던게 문제
20.04 focal을 설치해야 한다.
universe 도 설치해 보고 (실패)
https://askubuntu.com/questions/1244865/ros-download-unable-to-locate-package-error
ROS2 설치도 해보고 (실패)
https://hybridego.net/entry/ROS2-apt-update-key-%EB%AC%B8%EC%A0%9C
ros-latest 업데이트도 해보고 (실패)
https://ubuntu.com/download/alternative-downloads
ROS2 문서를 보니 20.04버전 Focal 만 설치 된다고 함
https://docs.ros.org/en/galactic/Installation.html
우분투 서버 버전별 이름
여기서 20.04 on raspberrypi 다운로드 가능
https://pimylifeup.com/ubuntu-server-raspberry-pi/
20.04 설치 과정 설명
https://linuxhint.com/install-ubuntu-desktop-20-04-lts-on-raspberry-pi-4/
wifi 설정
https://websetnet.net/ko/how-to-connect-to-wifi-from-the-terminal-in-ubuntu-linux/
YAML은 들여쓰기를 잘해야 한다
https://velog.io/@jnine/YAML%EC%9D%B4%EB%9E%80
와이파이가 안켜질때
putty 터미널 접속
https://toentoi.tistory.com/53
apt update 에러날때
sudo killall apt apt-get
  - 진행중인 프로세스가 없다라고 뜨면, 아래와 같이 하나하나씩 디렉토리를 삭제해주세요.
sudo rm /var/lib/apt/lists/lock
sudo rm /var/cache/apt/archives/lock
sudo rm /var/lib/dpkg/lock*
sudo dpkg --configure -a
sudo apt update
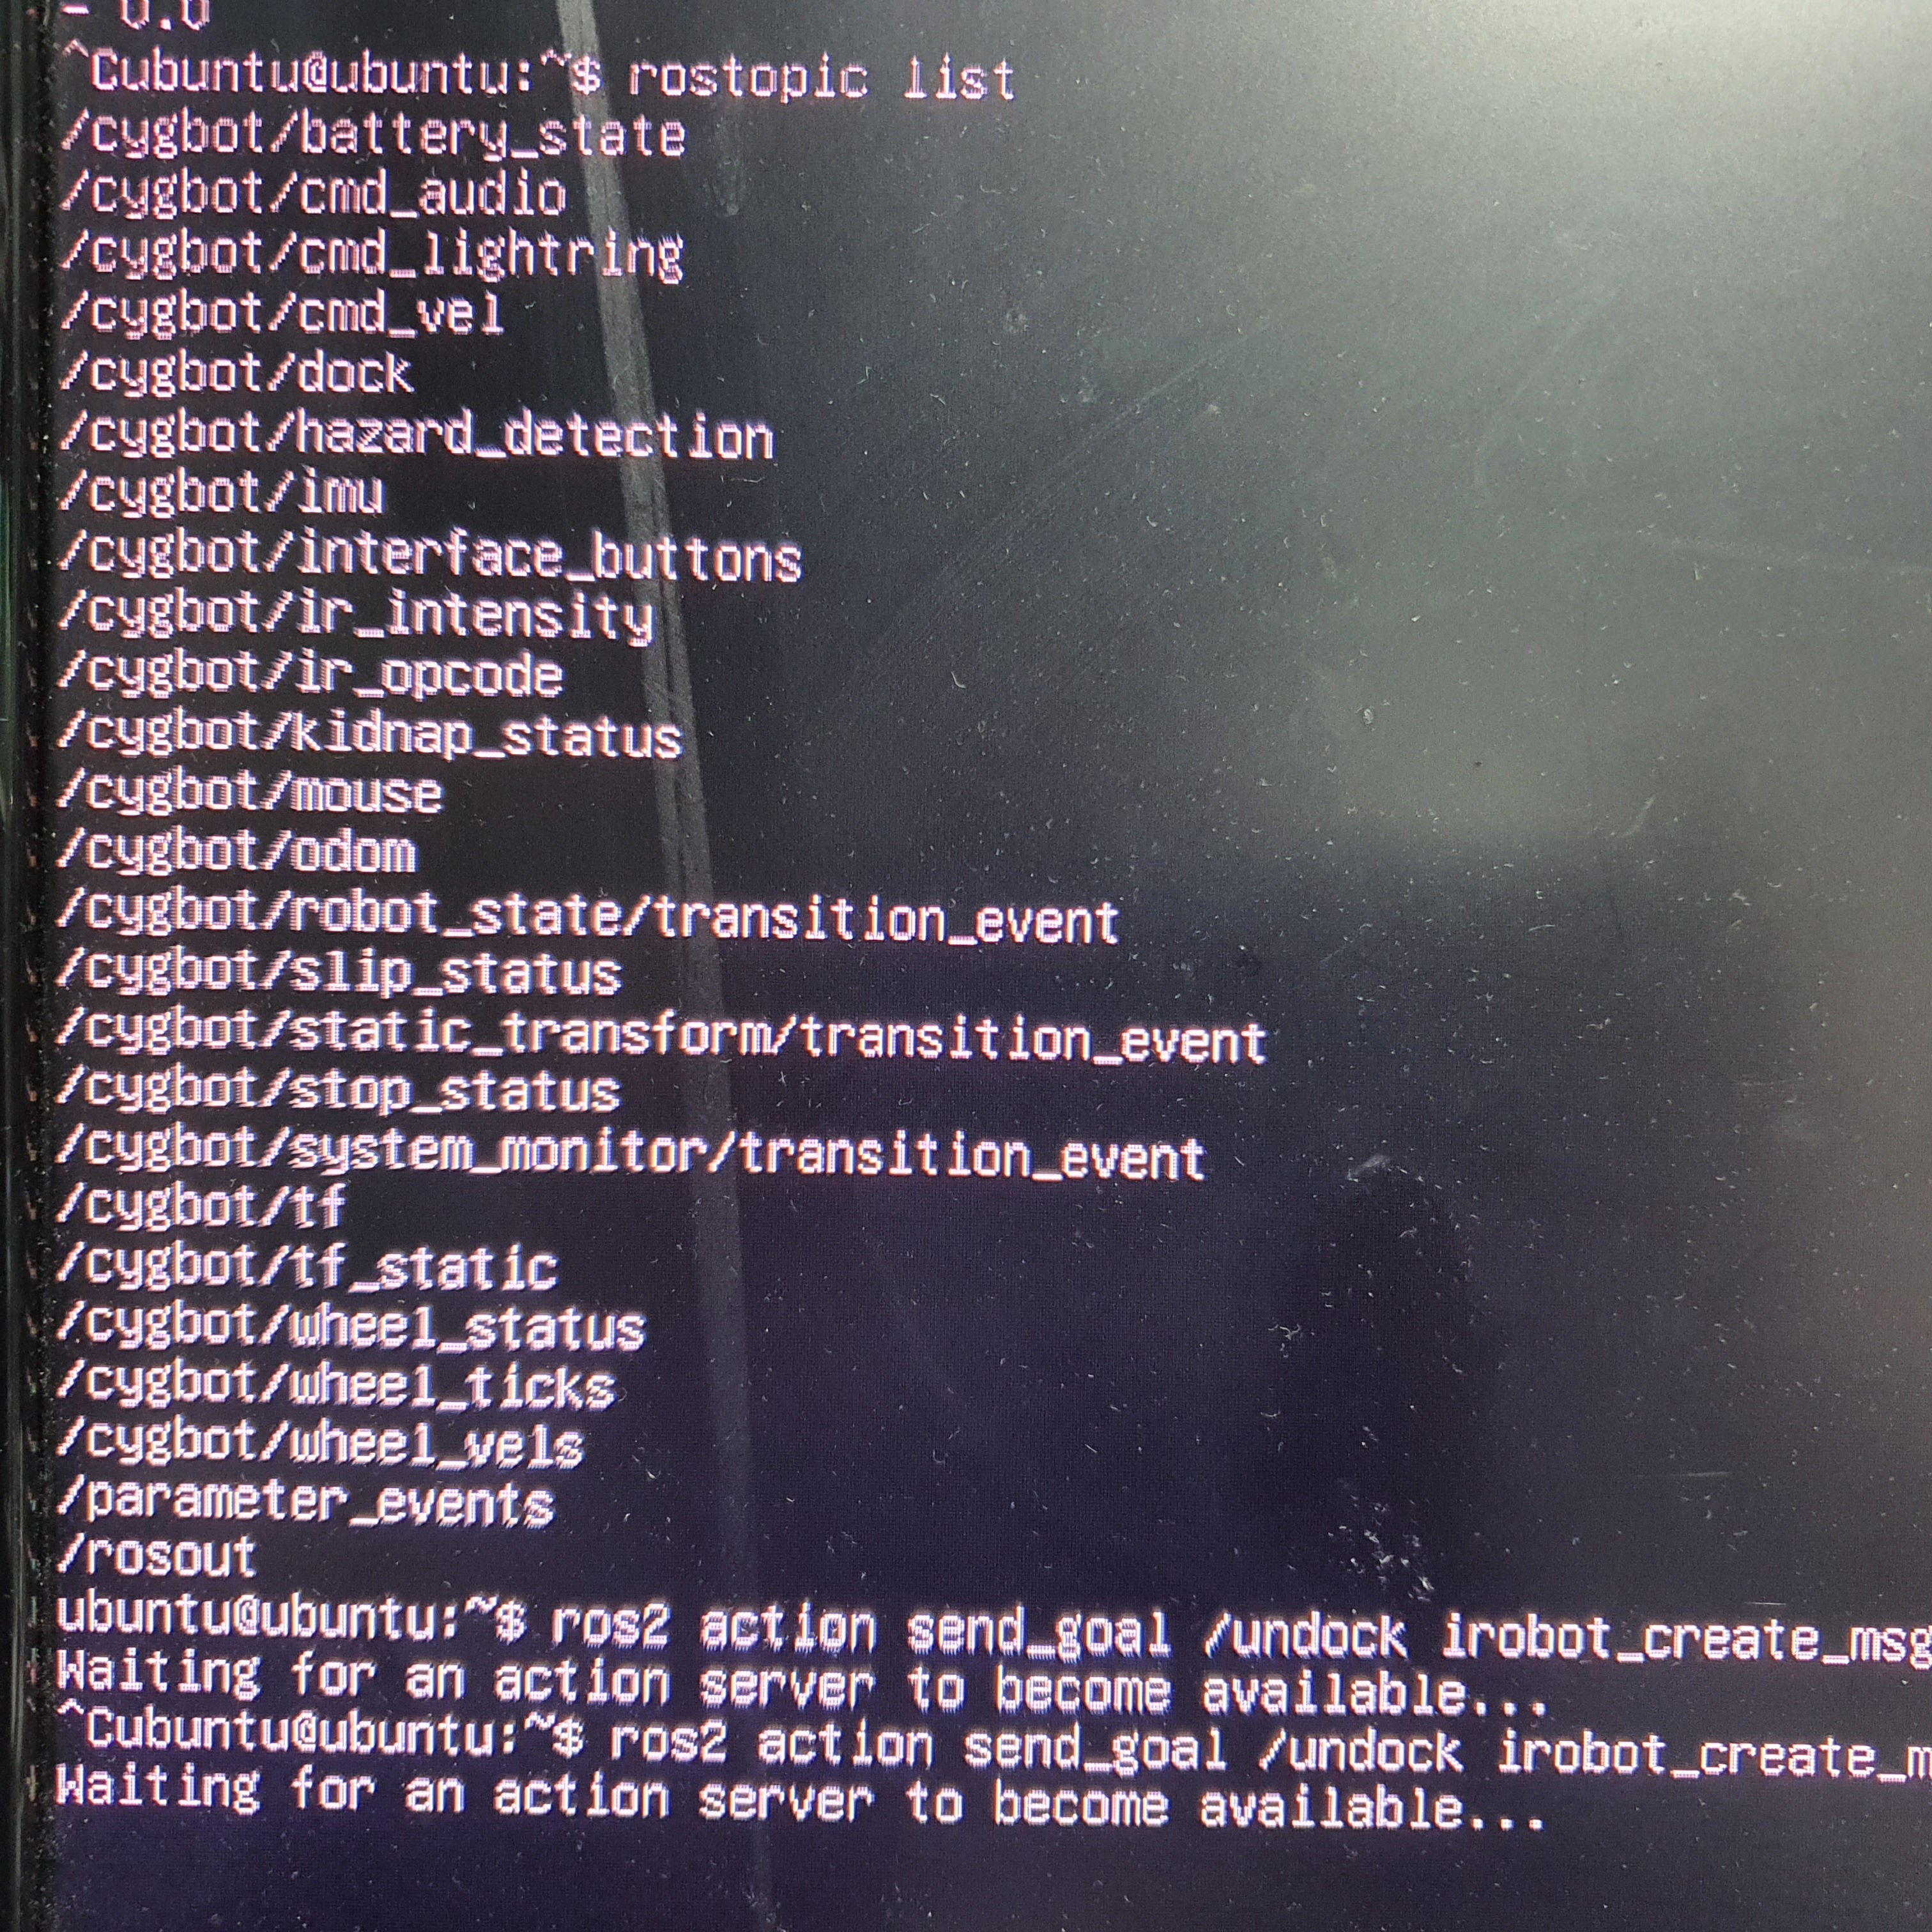
드디어 라즈베리파이4에 ROS 깔고, CREATE3와 USB로 연결 성공
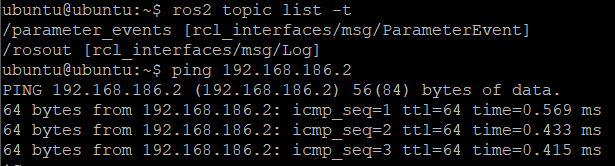
하지만 CREATE3에서 나와야 하는 토픽이 보이지 않는다
CREATE3인 192.168.186.2 는 ping으로 살아 있음을 확인함
라즈베리파이 보드는 192.168.186.3
CREATE3의 ROS는 상시동작인가? 아니면 시작하는 방법이 있는가??
setup 유튜브가 있었네... 따라하니까 토픽 나온다
https://edu.irobot.com/learning-library/create-3-getting-started
https://iroboteducation.github.io/create3_docs/api/docking/
Docking - Create® 3 Docs
Create® 3 Docking The Create® 3 robot is equipped with a docking station to recharge it between experiments. Through the ROS 2 APIs users can command docking and undocking autonomous behaviors. Note that, in order for the robot to detect the dock, determ
iroboteducation.github.io
http://192.168.0.58/home
CREATE3에 CONNECT 메뉴에서 와이파이를 지정해 주면 로봇에 직접 접속(192.168.0.10)하지 않고 IP로 접속 가능.
Undock 액션명령은 동작을 안하네.. 이건 왜 그럴까?
https://iroboteducation.github.io/create3_docs/api/docking/
ros2 action list -t
해보니 /cygbot/dock 이렇게 응답이 나온다
이걸보니 /dock 명령이 아니라 /cygbot/dock 으로 보내야 할것 같다.
ros2 action send_goal /cygbot/dock irobot_create_msgs/action/DockServo "{}"
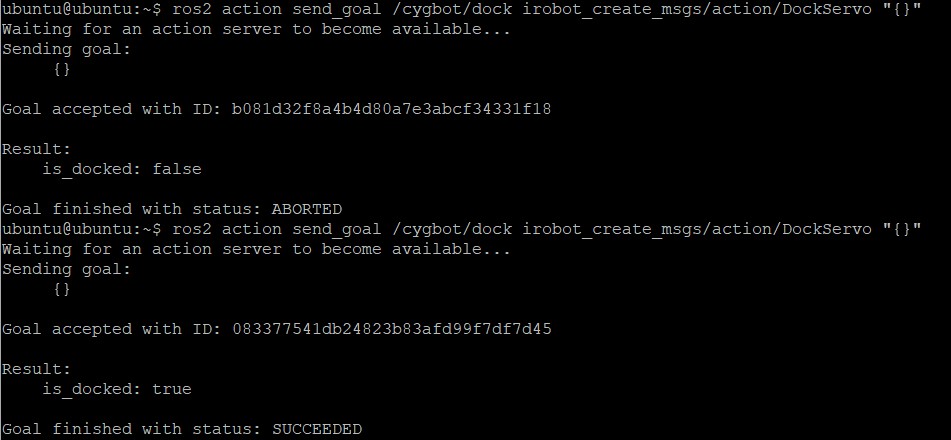
다시해보니 이런 에러가 난다.
tev: ddsi_udp_conn_write failed to udp/192.168.0.58:35455 failed with retcode -1
https://answers.ros.org/question/390859/ddsi_udp_conn_write-failed/
갑자기 wifi가 끊어진다
sudo iw wlan0 set power_save off
https://forum.clockworkpi.com/t/how-to-disable-wifi-power-save-to-prevent-disconnects/933
ip addr <== 이 명령으로 ip할당 여부 확인
/etc/init.d/networking restart <== 이 명령으로 wlan0 ip 가 생긴다
ls /sys/class/net
ip addr
/etc/init.d/networking restart
sudo apt install ifupdown
sudo ifup eth0
sudo vi /etc/network/interfaces
sudo systemctl stop NetworkManager.service
sudo systemctl disable NetworkManager.service
iw wlan0 set power_save off
iw wlan0 get power_save
-->Power save: on
/sbin/iwconfig wlan0 power off
connect: Network is unreachable
https://m.blog.naver.com/action1020/220087014790
https://forum.clockworkpi.com/t/how-to-disable-wifi-power-save-to-prevent-disconnects/933
Make "iw wlan0 set power_save off" permanent
https://raspberrypi.stackexchange.com/questions/96606/make-iw-wlan0-set-power-save-off-permanent
ddsi_udp_conn_write failed
https://answers.ros.org/question/390859/ddsi_udp_conn_write-failed/
